Introduction
In this tutorial, we are introducing JPA using restful services. Spring Data is an aspect of the Spring Boot family that focuses on how data is manipulated. With data consistently becoming part of our business process, the need to understand how to create, read and update data is important. Thankfully, Spring Data JPA provides an efficient way for data manipulation.
General Overview
Spring Data JPA is a framework that simplifies the implementation of JPA (Java Persistence API) based repositories. It provides a high-level repository abstraction for accessing data in databases, reducing the amount of boilerplate code required to implement the data access layer. Spring Data JPA allows you to perform database operations using predefined method names or custom query methods.
Getting Started
The general requirement needed for this tutorial include:
- Spring Boot 2.7* and above
- Spring Data JPA
- JDK 8 and above
- Database connector (e.g. MySQL)
Implementation – Setting up the JPA interface
JPA (Java Persistence API) is a Java specification for accessing, storing and managing data between Java objects/classes and relational databases (MySQL, PostgreSQL, etc.). Spring Boot provides a convenient way to use JPA through the Spring Data JPA project which provides a repository abstraction on top of JPA.
For example in our code:
public interface UserRepository extends CrudRepository<User, Long> {

    User findByTheUsersName(String username);

    Optional<User> findByUsername(Optional<String> username);

    List<User> findByLastname(String lastname);

    @Query("select u from User u where u.firstname = :firstname")
    List<User> findByFirstname(String firstname);

    @Query("select u from User u where u.firstname = :name or u.lastname = :name")
    List<User> findByFirstnameOrLastname(String name);

    @Query("select u from User u where u.firstname = :#{#user.firstname} or u.lastname = :#{#user.lastname}")
    Iterable<User> findByFirstnameOrLastname(User user);

}
The code above shows the implementation of our JPA repository. It supports custom queries and provides flexible means of fetching user data. An automated CRUD (create, read, update, and delete) method is imported due to the inclusion of the CRUDRepository.
Adding the Model
To keep things simple, we created a User model consisting of a username, first name, and last name.
 private static final long serialVersionUID = -2952735933715107252L;

    @Column(unique = true) private String username;

    private String firstname;
    private String lastname;

    public User() {
        this(null);
    }

    /**
     * Creates a new user instance.
     */
    public User(Long id) {
        this.setId(id);
    }

    public User(String firstname, String lastname) {
        this.firstname = firstname;
        this.lastname = lastname;
    }
Application settings and Pom.xml
In this tutorial we are using H2 in-memory database although any database can be configured inside the application.properties file. Maven repositories used can be found in pom.xml file of this tutorial.
spring.datasource.url=jdbc:h2:mem:db;DB_CLOSE_DELAY=-1
spring.h2.console.enabled=true
The Service class
In the service class, we implemented the interface
@Service
public class SimpleUserImpl implements SimpleUserRepo {
  private final UserRepository userRepository;
  public SimpleUserImpl(UserRepository userRepository) {
        this.userRepository = userRepository;
    }
    @Override
    public User Post(User params) {
        userRepository.save(params);
        return params;
    }
    @Override
    public List<User> Get() {
        return (List<User>) userRepository.findAll();
    }
    @Override
    public User Get(long id) {
        return userRepository.findById(id).get();
    }
    @Override
    public User Update(User params, long id) {

        User user =  userRepository.findById(id).get();
        user.setFirstname(params.getFirstname());
        user.setLastname(params.getLastname());

        return userRepository.save(user);
    }
    @Override
    public String Delete(long id) {
        userRepository.deleteById(id);
        return "User(" + id + ")" + " has been deleted!";
    }
}
The Controller Endpoints
@RestController
public class UserController {
private final SimpleUserImpl userService;
public UserController(SimpleUserImpl userService, UserRepository userRepository) {
this.userService = userService;
}
// Add
@PostMapping(value = "/users")
public User Post(@RequestBody User params) {
return userService.Post(params);
}
// Get
@GetMapping(value = "/users")
public List<User> Get() {
return userService.Get();
}
// Get By ID
@GetMapping(value = "/users/{id}")
public User Get(@PathVariable int id) {
return userService.Get(id);
}
// Update
@PutMapping(value = "/users/{id}")
public User Update(@PathVariable int id, @RequestBody User params) {
return userService.Update(params, id);
}
// Delete
@DeleteMapping(value = "/users/{id}")
public String Delete(@PathVariable int id) {
return userService.Delete(id);
}
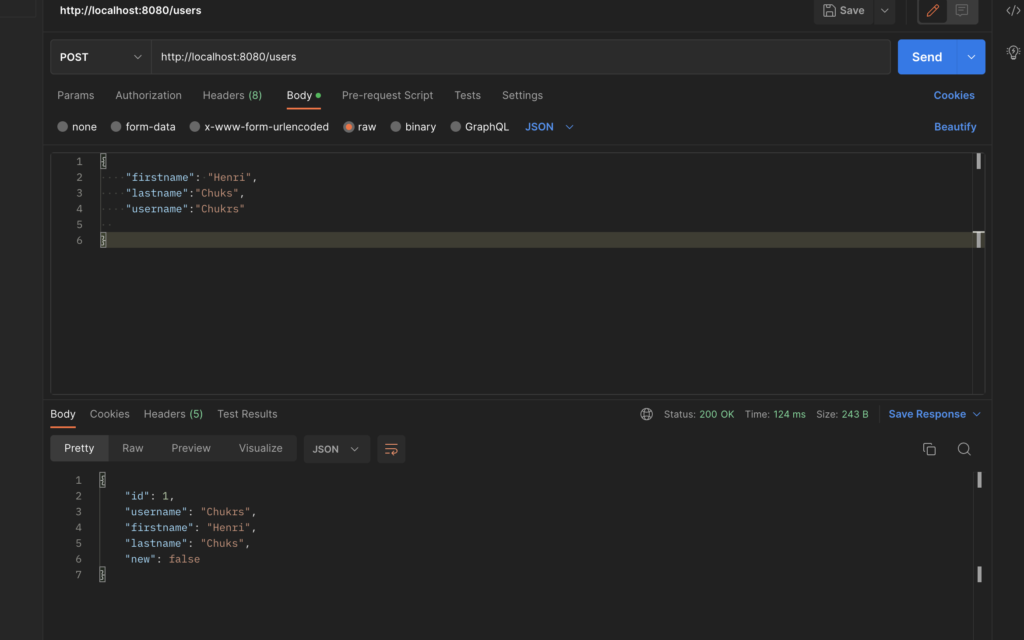
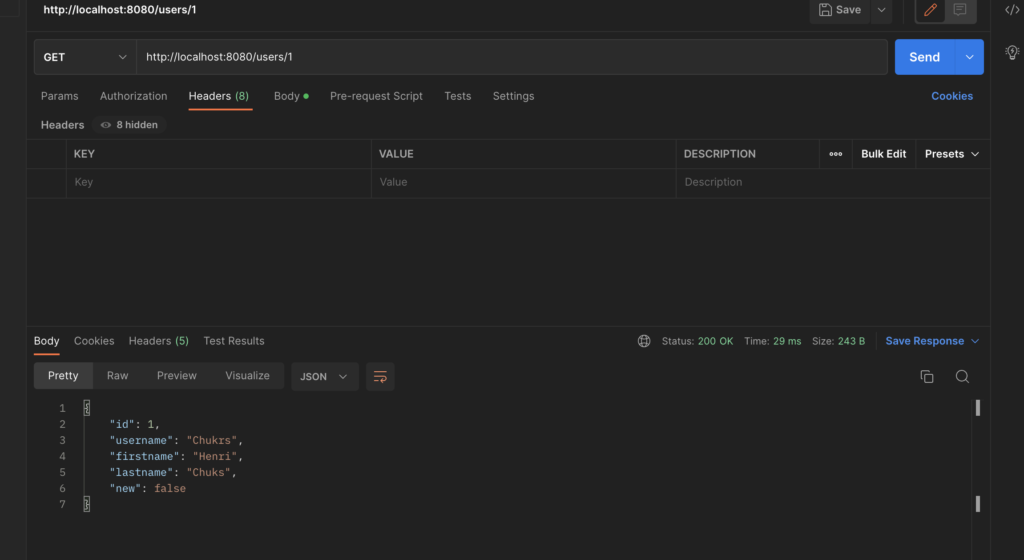
}Endpoints following our complete implementation

Conclusion
In this tutorial we have demonstrated how to implement CRUD operations using JPA and Restful services. The various endpoints were tested using Postman. As always, the code for this tutorial is available on our GitHub repository.
1 thought on “Understand JPA using Restful Services”